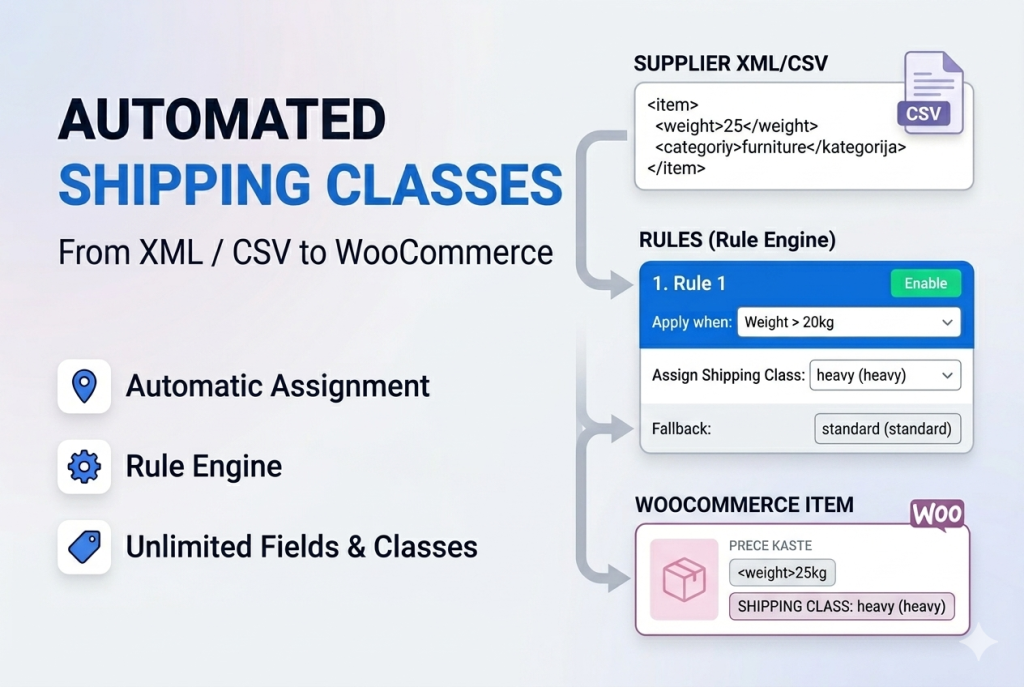
Automatically assigning shipping classes in WooCommerce after a product import is one of those problems that sould simple but never is not. You’ve just imported 3,000 products from your supplier’s XML feed. The import finished. Then you realize — every product has no shipping class. Or the wrong one. Again.
For most WooCommerce stores, fixing this means one of three things: manually editing products after every import, hiring a developer to write a PHP snippet that breaks on the next WooCommerce update, or buying a separate shipping class plugin on top of your import plugin.
This article shows a fourth option: automatic shipping class assignment built directly into the import process — no code, no extra plugins, no manual work after the fact.
Why Shipping Class Assignment Keeps Breaking
Shipping classes in WooCommerce are simple in theory. In practice, the problem is that most import tools treat them as just another field to map — and offer no logic layer on top of it. Your supplier’s XML doesn’t have a woocommerce_shipping_class field. It has weight, dimensions, category. Translating those into shipping classes requires rules — and most importers have no rule system.
So store owners end up with one of these workflows:
- Manual post-import editing — works for 50 products, breaks at 500, impossible at 5,000
- WP All Import + custom PHP — requires a developer, breaks on WooCommerce updates, no visual way to verify results before import runs
- Separate shipping class plugin — adds cost, runs as a second process after import, classes aren’t correct immediately when the import finishes
The real cost isn’t just money. It’s the recurring time every time your feed updates — daily, weekly, or on-demand.
| Approach | What you need | Ongoing work | Cost |
|---|---|---|---|
| Manual editing after import | Nothing extra | Hours per import | Your time |
| WP All Import + PHP snippet | Developer | Breaks on updates | Developer fee + $99+/yr |
| Import plugin + shipping class plugin | 2 plugins | Runs as 2nd process | $100–$200+/yr combined |
| Bootflow Importer (built-in) | 1 plugin | Zero — fully automatic | Included in Pro |
Try It on the Live Demo
Upload your own XML or CSV file and set up shipping class rules on the demo site — no account required.
Bootflow Product Importer Pro also includes: dynamic pricing engine with markup rules by category/price/any field, AI-powered field transformation and translation, variable product support, selective field updates, reusable import templates, and detailed per-product error logs. See all features →
The Professional Approach: Visual Rule Builder Built Into Your Importer
The most efficient solution is a single product importer with built-in shipping class assignment — where you define your logic once through a visual interface, and it applies automatically to every import forever.
No code required (though PHP formulas are available for advanced cases). No separate plugins. No manual work after import completes.
Here’s how it works in Bootflow Product Importer Pro:
Step 1: Upload Your XML or CSV File
Start by uploading your product feed — local file upload or remote URL. The system automatically detects file format (XML/CSV), available fields, and shows a sample of your data for preview.
Bootflow also supports scheduled imports: set it to pull the feed daily or weekly from your supplier’s URL, and everything that follows — including shipping class assignment — runs automatically on schedule.
Time: 30 seconds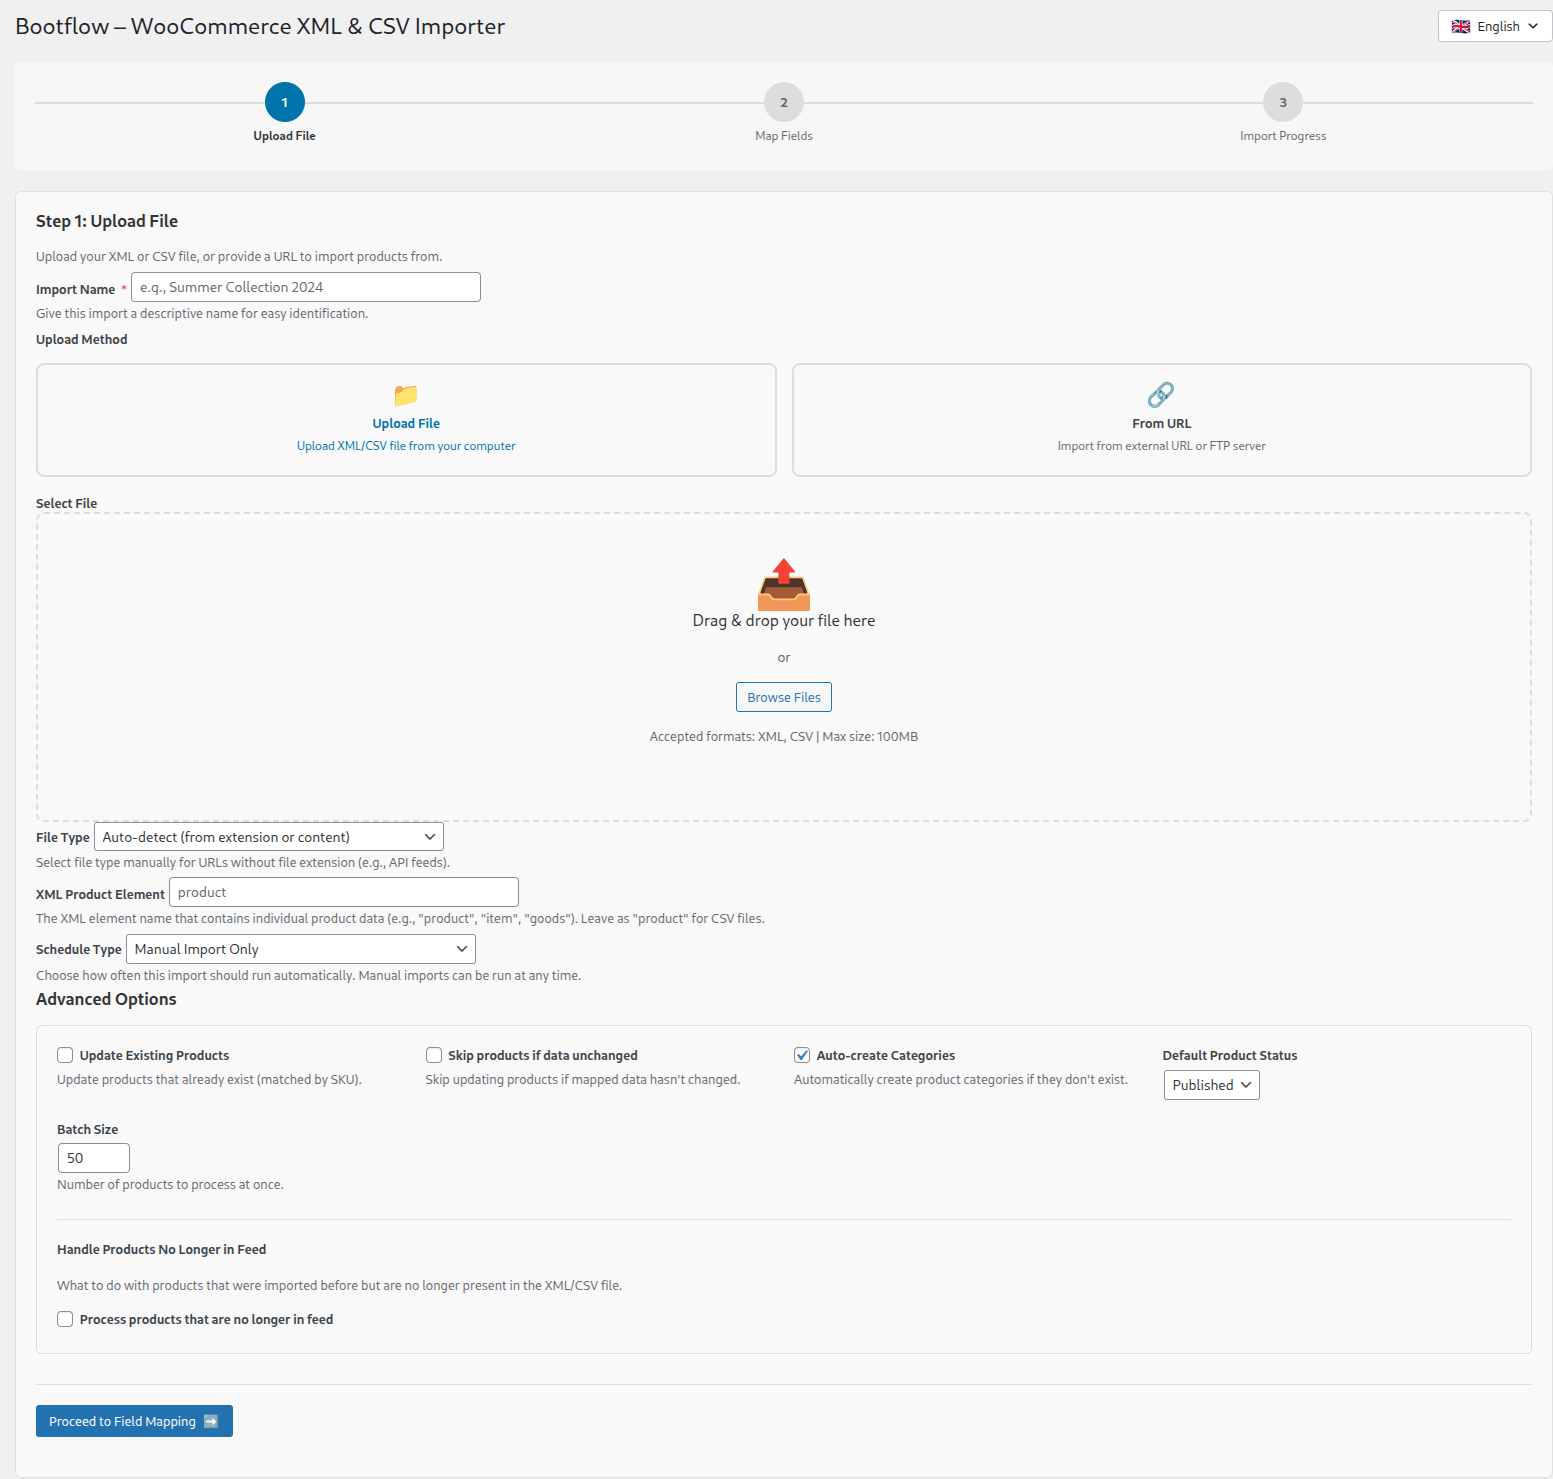
Step 2: Map Your Product Fields
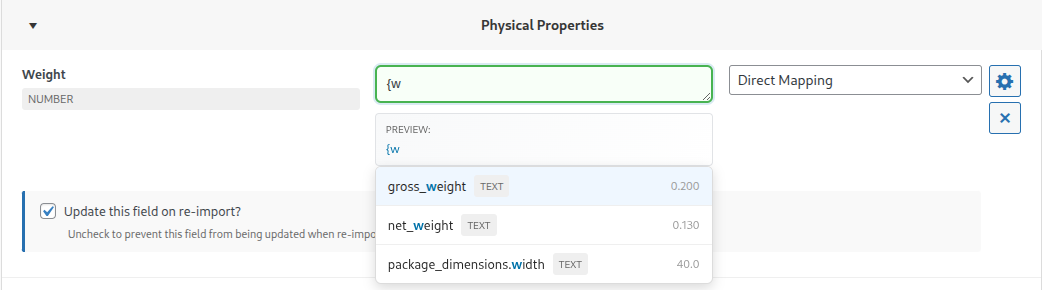
Click “Auto-Map Fields” and the system automatically matches your feed columns to WooCommerce fields — SKU, name, price, weight, category, brand, and 20+ other standard fields at 95%+ accuracy. You review and adjust exceptions.
For custom fields, type { followed by the first letter of the field name — an autocomplete dropdown appears instantly.
This is also where you can optionally enable AI-powered field transformation — rewrite product descriptions, translate content to any language, or clean up supplier data, per field, using your own OpenAI, Claude or Gemini API key.
Time: 2–5 minutes (vs. 30–40 minutes manual mapping)
Step 3: Open the Shipping Class Assignment Engine
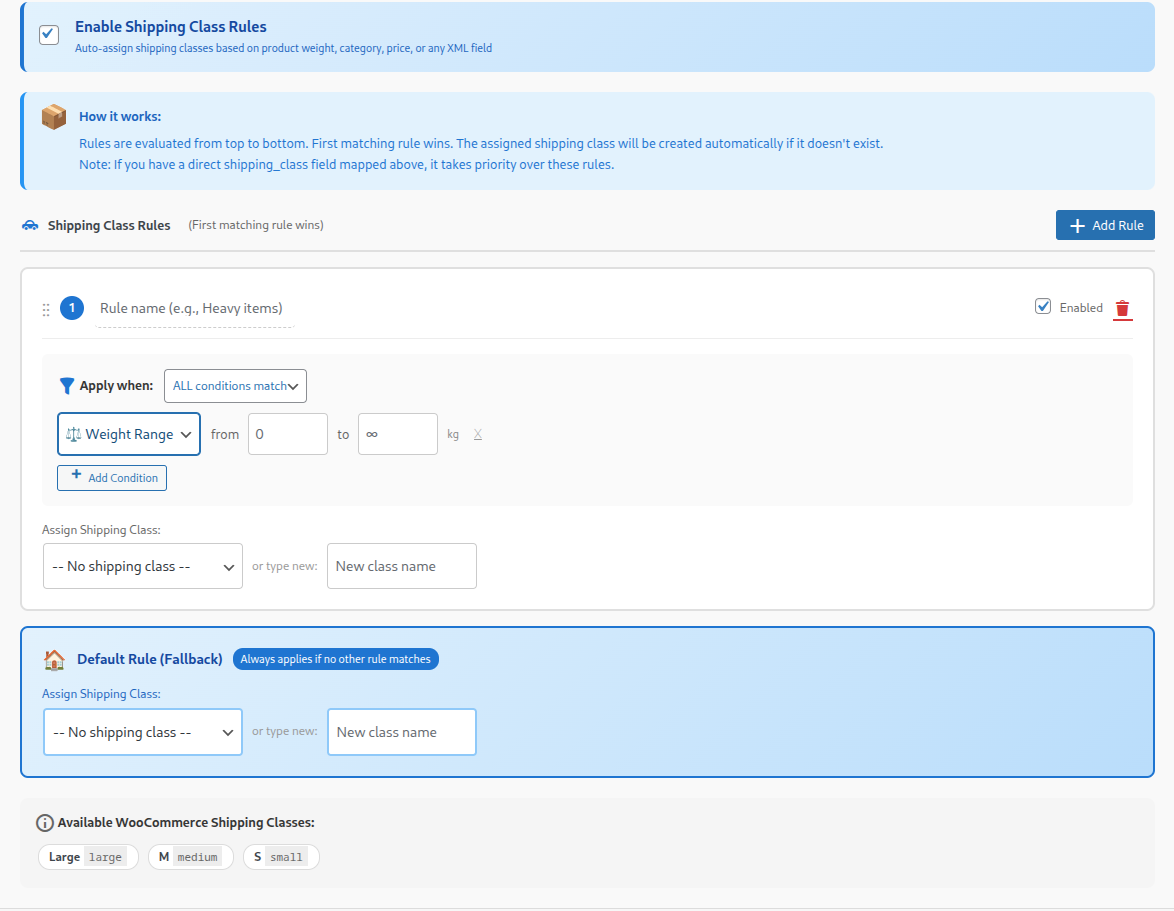
Scroll to the “Shipping Class Assignment” section in your import configuration. This is a visual rule builder — no code, no configuration files, no database queries.
Enable it with a single toggle. A rule panel appears immediately below.
Step 4: Build Your Assignment Rules
The engine uses a priority-based rule system: rules are evaluated top to bottom, and the first matching rule wins. A fallback “default” rule fires if nothing else matches — so no product is ever left without a class. Rules can be arranged with drag and drop using mouse.
Example Rule 1 — Lightweight items:
- Condition: Weight Range — 0 to 1 kg
- Assign: Light
Example Rule 2 — Standard items with combined conditions:
- Condition 1: Weight Range — 1 to 10 kg
- Condition 2: Volume (L×W×H) — 0 to 50,000 cm³
- All conditions in one rule = AND logic — product must match both
- Assign: Standard
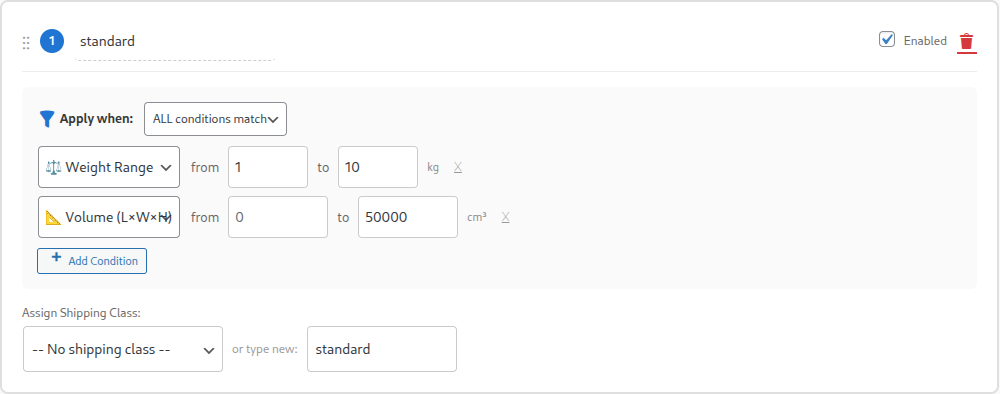
WordPress Woocommerce Shipping Class Engine Rules
Example Rule 3 — Category-based:
- Condition: Category = Electronics
- Assign: Insured-Shipping
Step 5: Available Condition Types
Each rule can use one or more conditions, combined with AND logic:
- ✅ Weight Range — from X kg to Y kg
- ✅ Price Range — from X to Y
- ✅ Volume — calculated from Length × Width × Height (cm³)
- ✅ Category — match product category from the feed
- ✅ Brand — match brand or manufacturer field
- ✅ SKU Pattern — regex matching, e.g. SKU starts with “HW-“
- ✅ Any XML/CSV field — match against any custom column in your feed
That last one deserves its own step.
Step 6: Use Any XML Field for Complex Logic
Your supplier’s feed might include fields like shipping_method, freight_class, vendor_code, or product_type. If the supplier already classifies their products, you can map that classification directly to your WooCommerce shipping classes — no manual translation required.
Example: Supplier XML includes <shipping_method> with values standard, express-only, freight:
- Condition: XML Field shipping_method = express-only
- Assign: Express-Only
Or a vendor code pattern:
- Condition: XML Field vendor_code starts with FREE-
- Assign: Free-Shipping
When you select “XML field” as the condition type, Bootflow shows a dropdown of every column available in your feed — you pick, set the operator (equals, contains, starts with), and set the value.
Step 7: Set the Default Fallback Rule
The default rule always fires last if no other rule matched. This guarantees every product gets a shipping class — even if your feed contains unexpected values your rules didn’t anticipate.
You can also create new shipping classes on the fly — if you type a class name that doesn’t exist yet in WooCommerce, Bootflow creates it automatically during import. No need to pre-create classes in WooCommerce settings first.

Works on Every Import — Including Automated Ones
Shipping class rules aren’t just for one-time imports. They run on every import, including scheduled ones.
If you’ve set up Bootflow to pull your supplier’s XML feed every Sunday at 2 AM, shipping classes are assigned correctly every time — automatically. And if a product’s weight changes in the new feed, its shipping class updates to reflect that too.
This is the part where most alternative setups fall apart. A separate shipping class plugin running on its own schedule might reassign classes an hour after your import completes — or miss runs entirely if cron timing doesn’t align. With Bootflow, the assignment is part of the import itself. One process, one result.
Real-World Example: Electronics Distributor, 4,500 Products
Supplier XML includes weight_kg, category, and vendor_code fields. Import runs weekly via server cron.
- Rule 1: Weight 0–2 kg → “Standard” class
- Rule 2: Weight 2–15 kg AND Category = “Monitors” → “Medium” class
- Rule 3: Weight 15 kg+ → “Heavy Freight” class
- Rule 4: XML field vendor_code starts with “FREE-” → “Free Shipping” class
- Default: “Standard” (catches edge cases)
Result: all 4,500 products have correct shipping classes every Monday morning. Zero manual work.
Summary
Automatic shipping class assignment during import isn’t a luxury feature — it’s a requirement for any store running regular feed syncs. Doing it manually doesn’t scale. PHP snippets break. Two separate plugins add cost and complexity.
Bootflow handles it in one place: a visual rule builder inside your import configuration, supporting weight, dimensions, price, category, brand, SKU patterns, and any custom XML field from your feed. Rules run on every import, including scheduled ones. New shipping classes are created on the fly if needed.
It’s one of the features that tends to pay for the plugin in the first week.
Related Articles:
https://bootflow.io/how-to-automatically-assign-shipping-classes-when-importing-products-in-woocommerce/
https://bootflow.io/how-to-auto-translate-woocommerce-products/
https://bootflow.io/how-to-auto-translate-woocommerce-products/