How to Import Your First WooCommerce Product XML CSV Feed
How to Import Your First WooCommerce Product XML CSV Feed
This tutorial explains how to import products into WooCommerce using an XML or CSV file.
Before You Start
Make sure that:
- WooCommerce is installed and activated.
- Bootflow Product Importer is installed and activated.
- You have an XML or CSV product feed.
- The product feed contains the information you want to import, such as product names, prices, descriptions, images, and stock quantities.
Step 1: Open the Product Importer
In your WordPress dashboard, go to:
Bootflow Importer → New Import
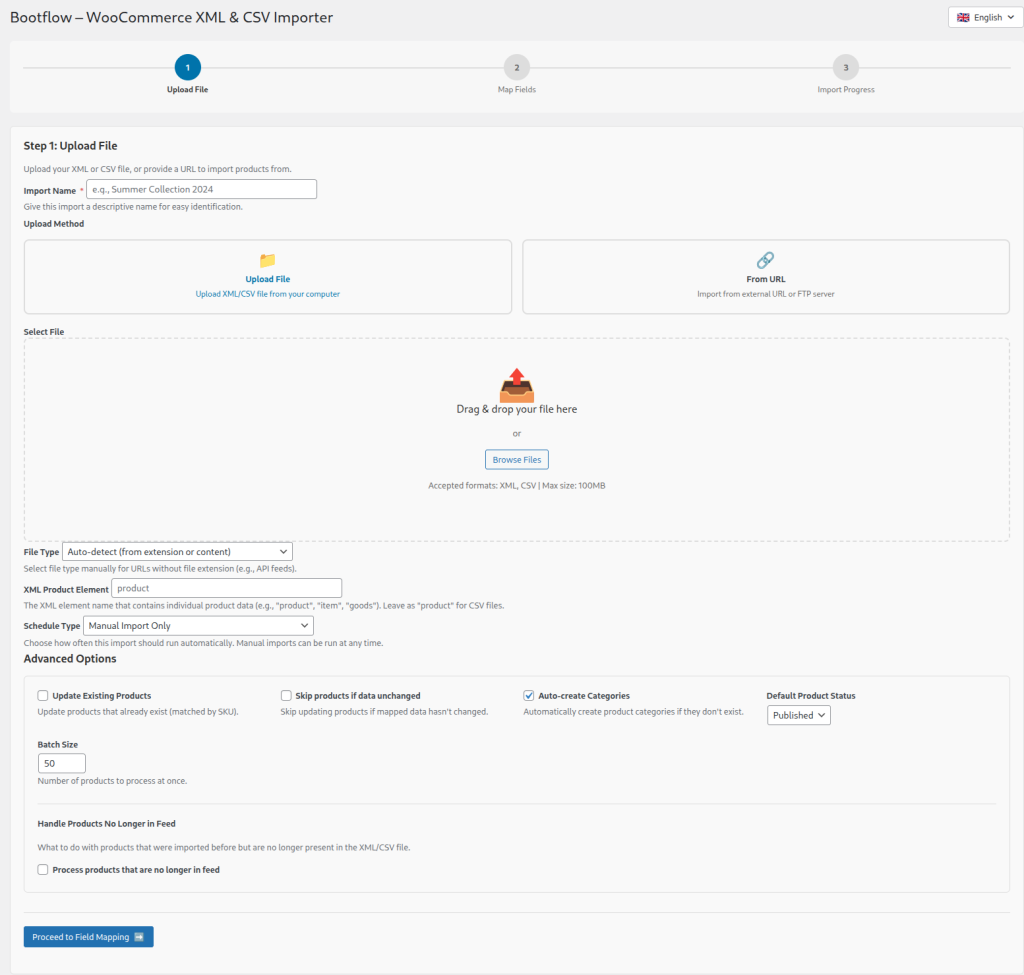
Basic Setup & Source
- Import Name: Enter a unique name to identify this import feed (e.g., “Summer Collection 2024”).
- Upload Method:
- Upload File: Choose file you want to upload.
- From URL: Paste a direct feed URL or FTP server link.
Feed Structure
- File Type: Set to
Auto-detect, or manually choose XML/CSV for custom API URLs. - XML Product Element: Specify the tag containing single item data (e.g.,
<product>,<item>). Leave as default for CSVs. - Schedule Type: Choose between manual execution or automated recurring imports.
Key Advanced Settings
- Update Existing Products: Enable to update existing store items matched by SKU(stock keeping unit).
- Skip Unchanged: Save server resources by skipping items with no data changes.
- Auto-create Categories: Automatically generate missing product categories.
- Default Status: Set initial status for imported items (
Published,Draft, etc.). - Batch Size: Set items processed per chunk (default:
50). - Handle Missing Items: Manage items removed from the source feed (e.g., mark as Draft or Out of Stock).
Step 2: Upload Your Product Feed
Press Proceed to Field Mapping
Step 3: Configure the Import.
Mapping Templates and AI Auto-Mapping
The mapping screen may also include additional tools:
- Mapping Templates: save a completed mapping and reuse it for another import with a similar file structure.
- AI Auto-Map: let the configured AI provider suggest connections between source fields and WooCommerce fields.
Always review automatically created mappings before importing. The importer displays a warning so that you can verify the suggestions.
Mapping Templates
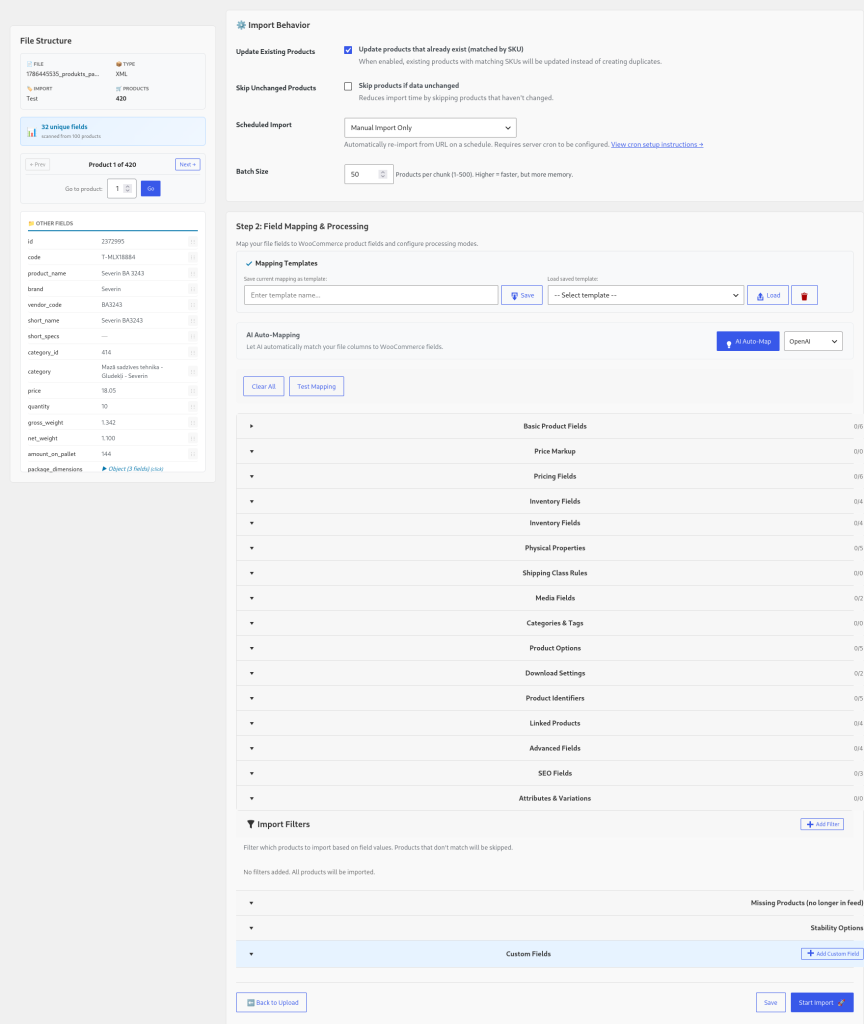
After the importer analyzes your XML or CSV file, it opens the Field Mapping & Processing screen.
This screen connects the fields from your source file with the WooCommerce product fields. In other words, you tell the importer where each product value comes from and how it should be processed.
How the Mapping Screen Works
The screen contains two important areas:
- File Structure panel in left: shows the fields detected in your XML or CSV file.
- Field Mapping panel in right: shows the WooCommerce fields that can receive values from your source file.
For example, your source file may contain these fields:
id
code
product_name
price
quantity
brand
category
These are source fields. The importer uses them to fill WooCommerce fields such as Product Name, SKU, Regular Price, Stock Quantity, Brand, and Categories.
The basic idea is:
WooCommerce target field <- Source field from your XML or CSV fileFor example:
Product Name   <- {product_name}
Regular Price  <- {price}
Stock Quantity <- {quantity}
The WooCommerce field is the destination. The value inside curly brackets is the field from your source file.
Map a Source Field
Each WooCommerce field has its own mapping row. To map a field:
- Open the relevant field section, for example Basic Product Fields or Pricing Fields.
- Find the WooCommerce field you want to configure.
- Click inside its mapping input.
- Type
{to open the list of available fields from your XML or CSV file. - Select a field from the dropdown.
- The importer inserts the selected field in curly brackets. You can choose more than one field from xml/csv and add text.
For example:
{product_name} BUY NOW FOR {price}For example, to map the product name, select product_name. The mapping becomes:
{product_name}You can also type part of a field name after { to filter the dropdown. For example, typing {pri will show source fields that contain pri.
Use Drag and Drop
You can map fields without typing them manually:
- Find the required source field in the File Structure panel.
- Drag the field to the mapping input for the WooCommerce field.
- Drop it into the input.
The importer inserts the field as a placeholder, for example:
This is useful when the source file contains many fields or uses long nested field names.
Processing Modes
The processing mode controls what happens to a mapped value after it is read from the source file.
- Direct Mapping: imports the source value without transformation.
- PHP Formula: changes or calculates the value using a PHP formula.
- AI Processing: uses an AI provider to transform or generate the value.
- Hybrid (PHP + AI): combines PHP processing with AI processing.
For a standard product import, keep the mode set to Direct Mapping. Use the other modes only when you need to change prices, clean descriptions, translate text, or create a value from multiple source fields.
AI Processing Example
You write an AI prompt describing what you want done. For example:
Translate {description} into English and improve the grammar.Or generate a completely new value using context from other fields:
Write a short, engaging product description for {product_name} in the {category} category, using {brand} and {price} as context.The AI can process any field, and because it has access to the other mapped fields as context, it can combine or reference multiple source fields when generating the result — translating, summarizing, categorizing, rewriting, or creating a value from scratch.
Required and Optional Fields
Some fields are required and are marked with an asterisk. The Product Code (SKU) field is especially important because the importer uses the SKU to identify existing products.
When Update Existing Products is enabled, products with a matching SKU are updated instead of being created as duplicates.
Mapping Sections
WooCommerce fields are grouped into expandable sections. Open only the sections that you need for the current import.
- Basic Product Fields: SKU, product name, product type, descriptions, and status.
- Price Markup: pricing rules that calculate final prices from a base price.
- Pricing Fields: regular price, sale price, sale dates, and tax settings.
- Inventory Fields: stock management, stock quantity, stock status, and backorders.
- Shipping Fields: weight, dimensions, and shipping class.
- Media Fields: product images and featured images.
- Product Identifiers: EAN, UPC, ISBN, MPN, and GTIN.
- Linked Products: upsells, cross-sells, grouped products, and parent products.
- Advanced Fields: additional WooCommerce product settings.
- SEO Fields: meta title, meta description, and meta keywords.
- Attributes & Variations: product attributes and variable product data.
Test the Mapping
Before starting the import, click Test Mapping to check whether the mapped fields return the expected values.
If a value is incorrect, you can:
- Type
{and choose a different source field. - Drag another field from the File Structure panel.
- Clear the current mapping and enter it again.
- Change the processing mode if the value needs transformation.
Use Clear All only when you want to remove all current mappings and start again.
When the mappings return the correct values, continue to the next step and start the import.
Step 4: Start the Import
Review your settings and click Start Import.
The importer will create or update WooCommerce products based on the selected configuration.